

12 Small Bathroom Storage Ideas (DIY)
Tiny bathroom, big frustration. If your countertop is a jungle of bottles, your towels live on the floor, and you can never find the bobby pins, you’re not alone — the average small bathroom has less than two square feet of workable storage, and most of us use exactly none of it well. But here’s the secret: small bathrooms don’t need more space, they need smarter space. These 12 small bathroom storage ideas diy are all DIY-friendly, budget-conscious projects that turn dead corners, empty walls, and wasted under-sink chaos into genuinely useful storage. None of them require a renovation, a contractor, or a big budget — just a free afternoon and the willingness to think vertically.
1. Floating Shelves Above the Toilet (Small Bathroom Storage Ideas DIY)
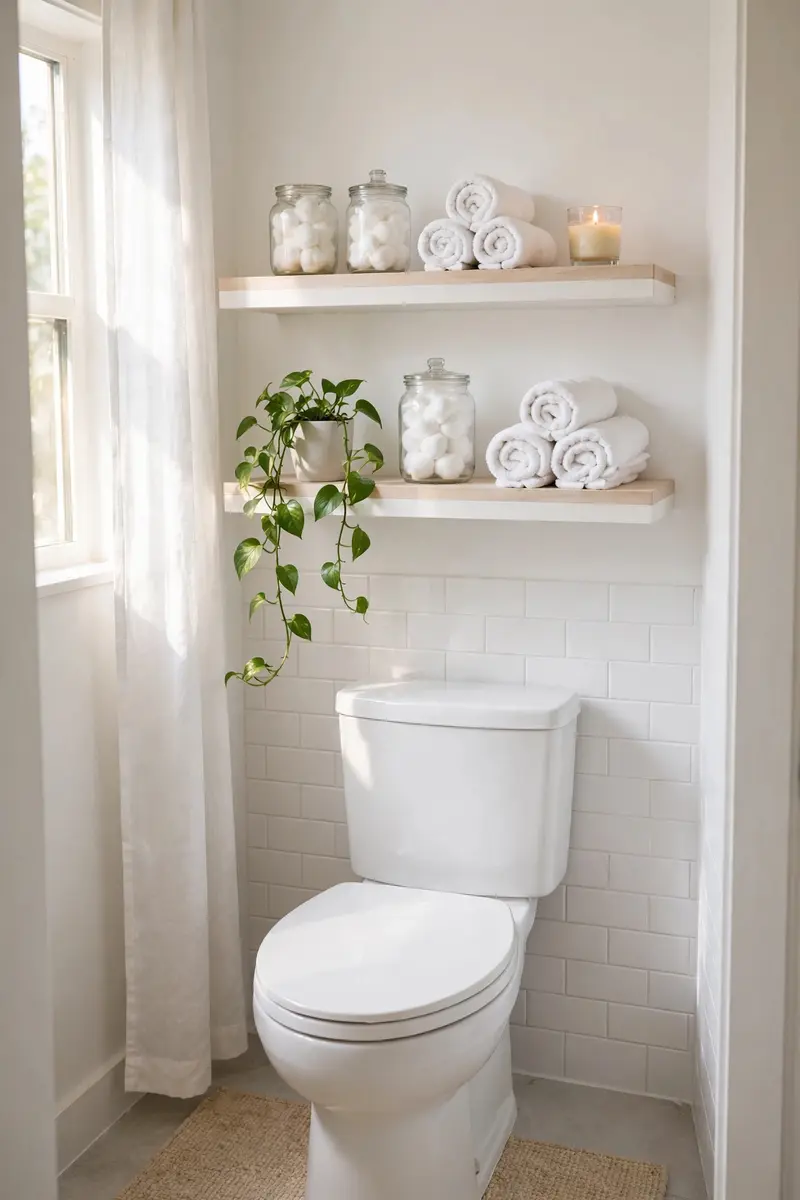
As small bathroom storage ideas diy go, this one is a classic. The wall above the toilet is dead space in almost every bathroom, and floating shelves turn it into your best storage zone. Two simple shelves hold rolled towels, baskets of toiletries, and a small plant — giving you roughly two extra square feet of storage where there was none, without touching your floor plan at all.
Materials + cost: Two 24-inch pine boards ($6–$10), hidden floating-shelf brackets ($8–$12), wood screws, optional stain or paint ($5–$8). Total: about $20–$25.
Position your first shelf about 12 inches above the toilet tank lid — high enough to avoid splashes, low enough to reach easily. Drill into studs if you can; if not, use toggle anchors rated for at least 30 pounds, because shelves holding towels and jars get heavy fast. Slide the boards on, level everything, and style with intention: rolled hand towels on the lower shelf, prettier items — a candle, a small trailing plant, folded washcloths in a basket — up top. Keep heavier items near the wall and lighter ones at the front edge.
Pro tip: Leave about a third of each shelf empty. Negative space is what separates styled, airy shelving from a cluttered shelf that makes the room feel smaller.
Variation idea: Paint the shelves the same color as your wall for a built-in look that visually disappears — very 2026, when storage that looks built-in rather than bulky is the whole trend.
2. DIY Wooden Crate Wall Shelves
Like many small bathroom storage ideas diy, this build costs less than a pizza. Wooden crates — the kind from craft stores, farmers markets, or your neighbor’s garage — mounted on the wall become charming cubby-style storage with real personality. They’re deep enough to swallow stacks of towels or bulk toilet-paper packs, and the rustic texture adds warmth that flat-pack shelving just can’t.
Materials + cost: Three to four wooden crates ($5–$8 each), sandpaper ($3), wood screws, optional whitewash or stain ($5). Total: about $25–$40.
Sand the crates smooth so they won’t snag towels, then paint, whitewash, or stain them to match your bathroom — or leave them raw for a farmhouse feel. Mount them directly to the wall through the crate backs, either stacked in a column, arranged in a loose grid, or scattered asymmetrically. Drill into studs for the top crate; lower ones can ride on good anchors. Leave one crate open for display (a plant, a folded stack) and use the rest for actual storage.
Pro tip: Line the crate bottoms with a piece of cute contact paper or a scrap of waterproof fabric — it protects the wood from damp items and looks intentional if anyone peeks inside.
Variation idea: Stack two crates on the floor beside the toilet instead of wall-mounting for a renter-friendly version that needs zero holes.

3. Leaning Ladder Shelf (No Holes Needed)
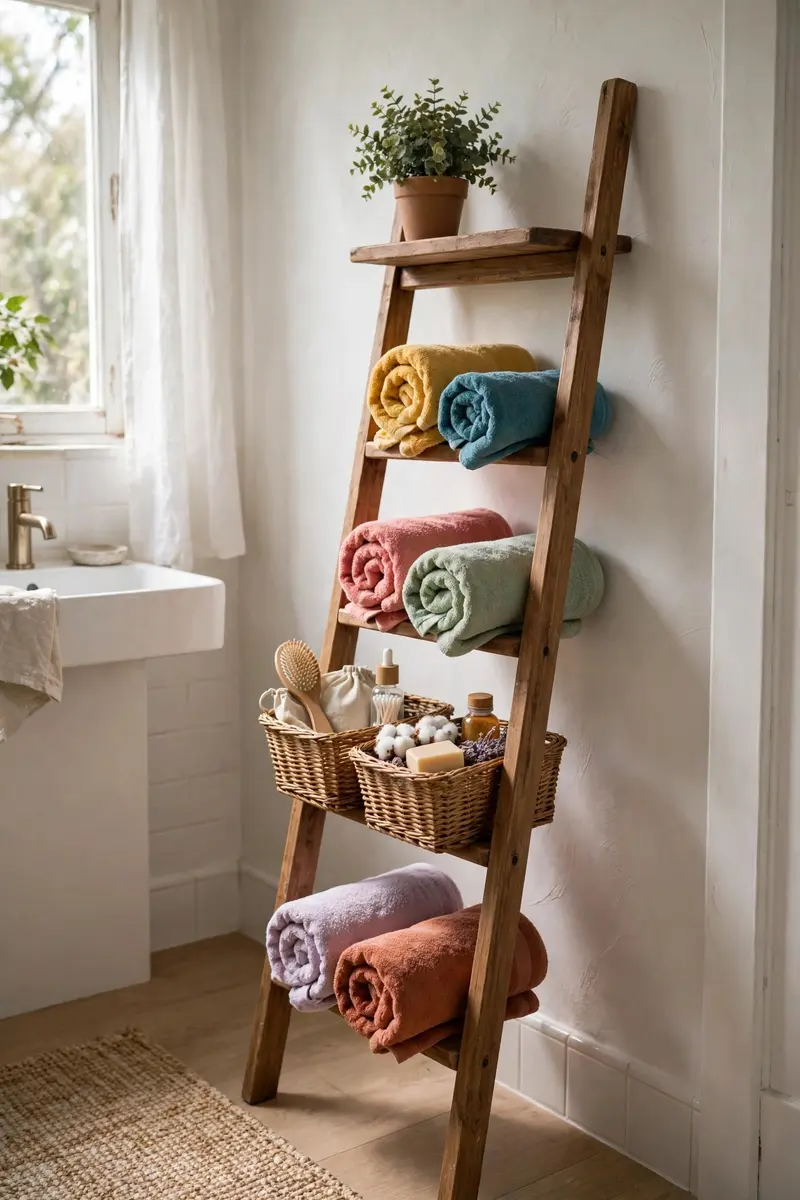
As small bathroom storage ideas diy go, this is the ultimate no-drill solution for renters. A leaning ladder shelf is the renter’s best friend: it gives you four or five tiers of open storage, leans at an angle against any wall, and installs in about thirty seconds — because there’s no installation. It’s one of the most-saved bathroom ideas on Pinterest for a reason: all the vertical storage of a bookcase, none of the commitment.
Materials + cost: A leaning ladder shelf ($30–$50 new; often $10–$15 thrifted), optional stain or paint ($5). Total: about $10–$50.
Just lean it where you want it — the narrow wedge beside the vanity or the wall opposite the shower works beautifully. Dress each rung: rolled towels on the lower rungs, baskets of toiletries in the middle, a plant and decor up top. Make sure the feet sit flat and won’t slide on tile — felt pads or a small rubber doorstop behind the base keeps it rock-steady. If you buy one new, measure your ceiling height first; standard ladder shelves run five to six feet tall.
Pro tip: Put your most-used items at waist-to-chest height on the ladder — no crouching, no reaching. It’s a small detail that makes the whole thing feel effortless to live with.
Variation idea: A vintage wooden ladder from a thrift store ($5–$15) gives the same silhouette with more character — just sand it well and drape towels over the rungs.
4. Under-Sink Stackable Bins + Tension Rod (Small Bathroom Storage Ideas DIY)
The cabinet under your sink is the Bermuda Triangle of bathrooms — pipes, weird angles, everything shoved in and nothing findable. Stackable bins and a tension rod tame it completely: bins turn the chaos into sorted drawers, and a tension rod mounted just below the top of the cabinet holds all your spray bottles by their triggers.
These small bathroom storage ideas diy are perfect for taming the chaos under your sink.
Materials + cost: Two or three stackable plastic bins ($3–$6 each), a small tension rod ($8–$12), optional adhesive hooks ($4). Total: about $20–$30.
Start by pulling everything out and tossing the expired stuff — this is the step everyone skips and everyone needs. Measure your cabinet, then install a tension rod across the width about eight inches below the cabinet ceiling; hang your cleaning spray bottles from it so they float above everything else. Stack the bins around the pipes — two-high stacks fit most cabinets — and sort by category: daily skincare in one, hair stuff in another, cleaning supplies in the third. Stick a small adhesive hook on the inside of the cabinet door for a hairdryer or hand towel.
Pro tip: Label every bin with a label maker or painter’s tape. It sounds fussy, but labels are what keep the system alive three months later — no label, no discipline.
Variation idea: A lazy susan (turntable) in the cabinet corner makes deep, pipe-awkward corners suddenly reachable — give it a spin and grab what you need.

5. Mason Jar Wall Organizer
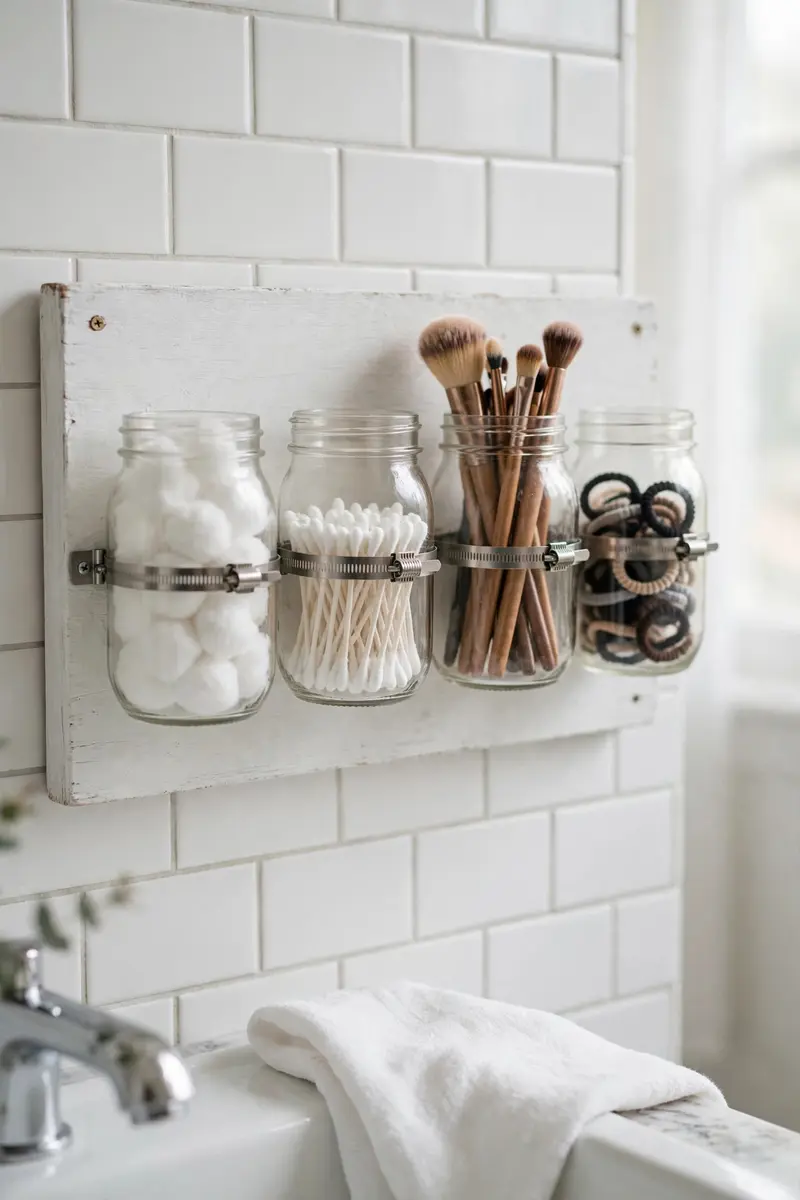
Mason jars mounted on a painted wooden board create a charming wall organizer for cotton balls, makeup brushes, toothbrushes, and q-tips — everything visible, everything off the counter. It costs almost nothing, looks like a boutique apothecary display, and frees up real counter real estate.
Among cute small bathroom storage ideas diy projects, this wall organizer is a reader favorite.
Materials + cost: A 1×6 pine board about 24 inches long ($4–$6), four mason jars ($1 each at a dollar store), hose clamps ($1 each), wood screws, paint or stain ($5). Total: about $12–$16.
Paint or stain your board and let it dry fully. Screw a hose clamp around each jar just below the rim — the clamp acts as a collar that holds the jar while leaving the top open for easy access. Attach the clamped jars to the board with short screws, spacing them evenly, then mount the whole board to the wall at eye level near your sink. Fill each jar with one category: cotton balls, swabs, brushes, hair ties. The uniform glass keeps it tidy even when the contents are chaotic.
Pro tip: Use wide-mouth jars for brushes and regular-mouth for small items — the wrong mouth size is the most common reason these organizers annoy people instead of helping.
Variation idea: Swap mason jars for tinted amber or blue glass bottles for a vintage apothecary look that costs exactly the same.
6. Wall-Mounted Baskets for Towels
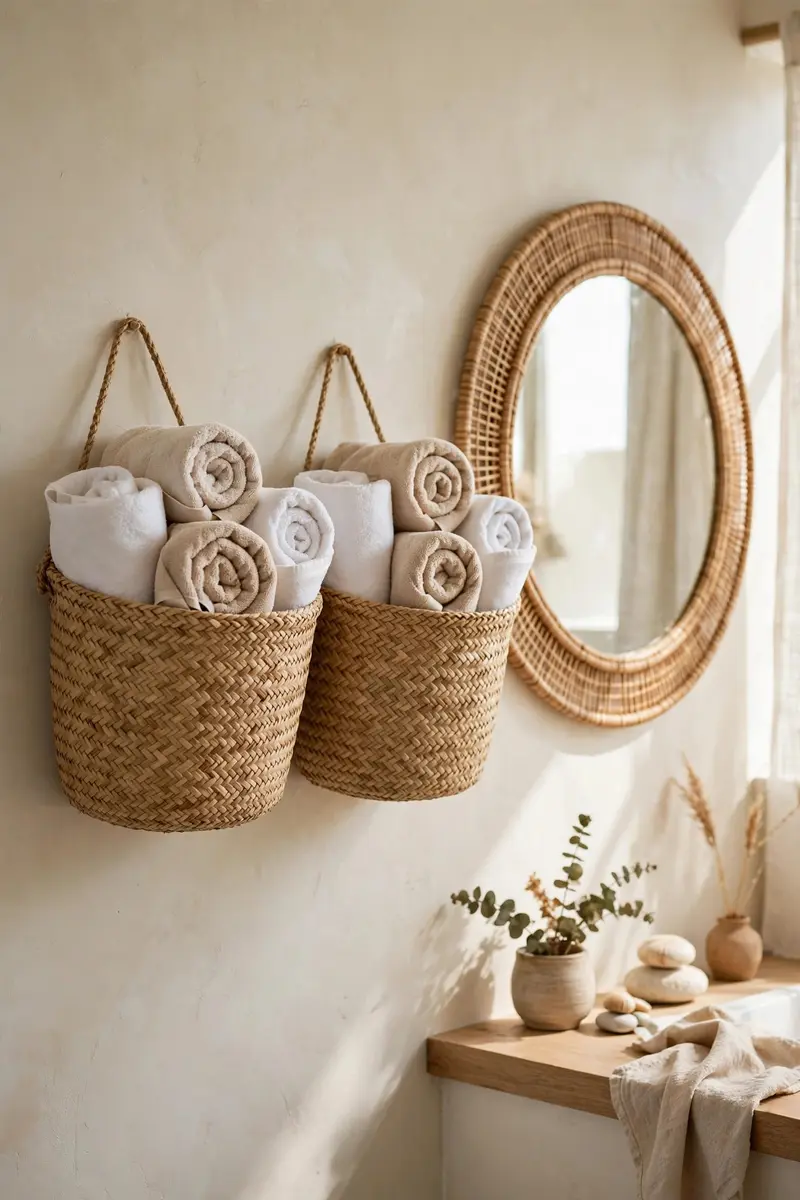
Wall-mounted wire or woven baskets turn towels into wall decor — roll your hand towels and washcloths, tuck them into baskets screwed to the wall, and you get storage that looks like a styling choice. It frees the floor, skips the towel bar entirely, and works in the narrowest gaps, like the strip of wall between the door and the vanity.
These small bathroom storage ideas diy turn everyday towels into wall decor.
Materials + cost: Two or three wall-mountable baskets — wire or seagrass ($6–$12 each), screws and wall anchors ($4). Total: about $15–$40.
Choose a spot you pass naturally — beside the shower or sink is ideal. Screw the baskets directly to the wall through their backs, spacing them vertically about ten inches apart. Roll towels instead of folding them: rolled towels pack tighter, show less wear, and look styled rather than stuffed. Woven seagrass baskets suit boho and coastal bathrooms; black wire baskets read modern and let you see what’s inside.
Pro tip: Keep one basket for clean towels and a separate one for in-use towels — mixing them is how the system slowly becomes a mess nobody trusts.
Variation idea: One large basket mounted at eye level can hold toilet-paper rolls prettily — far nicer than a sad stack on the tank.
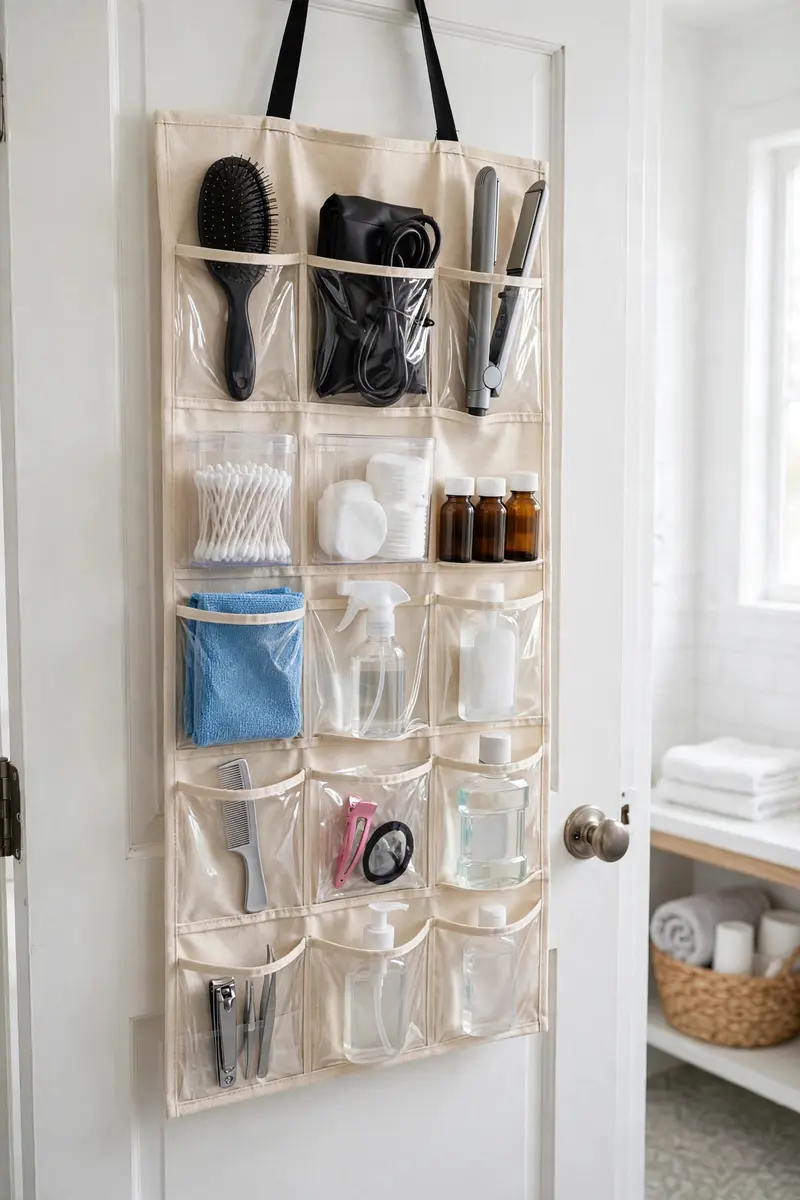
7. Over-the-Door Organizer
The back of your bathroom door is free, flat, invisible storage space — an over-the-door organizer puts it to work in about two minutes with zero tools. It swallows hair tools, cleaning supplies, extra toiletries, and all those “where do I put this?” items that usually end up on the counter.
When floor space is zero, these small bathroom storage ideas diy use the back of your door.
Materials + cost: One over-the-door organizer with clear pockets or a hanging wire rack ($12–$20), two over-door hooks (often included). Total: about $12–$20.
Hook it over the door and check that the door still closes — most fit fine, but thick towels or a tight door jamb can snag, so test before loading it up. Sort by zone: top rows for hair tools and styling products, middle rows for medicines and first-aid, bottom rows for cleaning supplies and extras. Clear pockets are worth the extra couple dollars because you can see everything at a glance instead of digging.
Pro tip: Reserve one pocket for a small trash bag or lint roller — the things you reach for constantly but never have a proper home for.
Variation idea: Use two narrow shoe-style organizers side by side on a wide door for double the sorted storage.
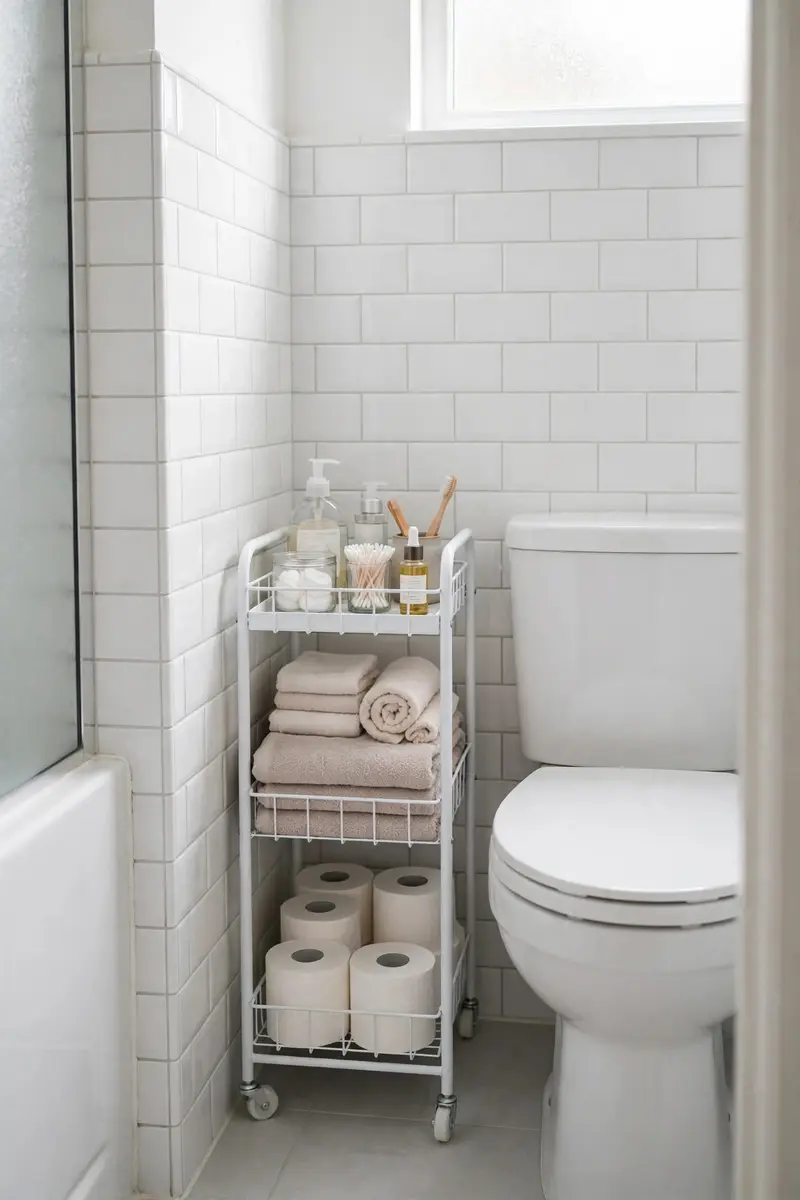
8. Slim Rolling Cart (Small Bathroom Storage Ideas DIY)
A slim rolling cart — the three-tier kind that fits in a six-inch gap — is basically a portable storage closet for bathrooms. It slides into the dead space between the toilet and the wall, holds bottles, towels, and toiletries on three levels, and rolls out when you need it. When you don’t, it disappears back into the gap.
This is one of those small bathroom storage ideas diy renters swear by for narrow gaps.
Materials + cost: One slim three-tier rolling cart ($20–$30). Total: about $20–$30.
Measure your gap first — most slim carts are about six to seven inches wide, but check before ordering. Load it by frequency: daily essentials on the top tier, weekly items in the middle, backups and bulk at the bottom. Stick it in the gap beside the toilet, the vanity, or between the wall and the tub. The wheels are the whole point — you can roll it out to grab things and roll it back without bending into awkward corners.
Pro tip: Add small non-slip shelf liner to each tier. Without it, bottles slide and topple every time you roll the cart — with it, everything stays put.
Variation idea: Dedicate the whole cart to one category — a “skincare cart” or “cleaning cart” — for spa-day energy or guest-bathroom readiness.
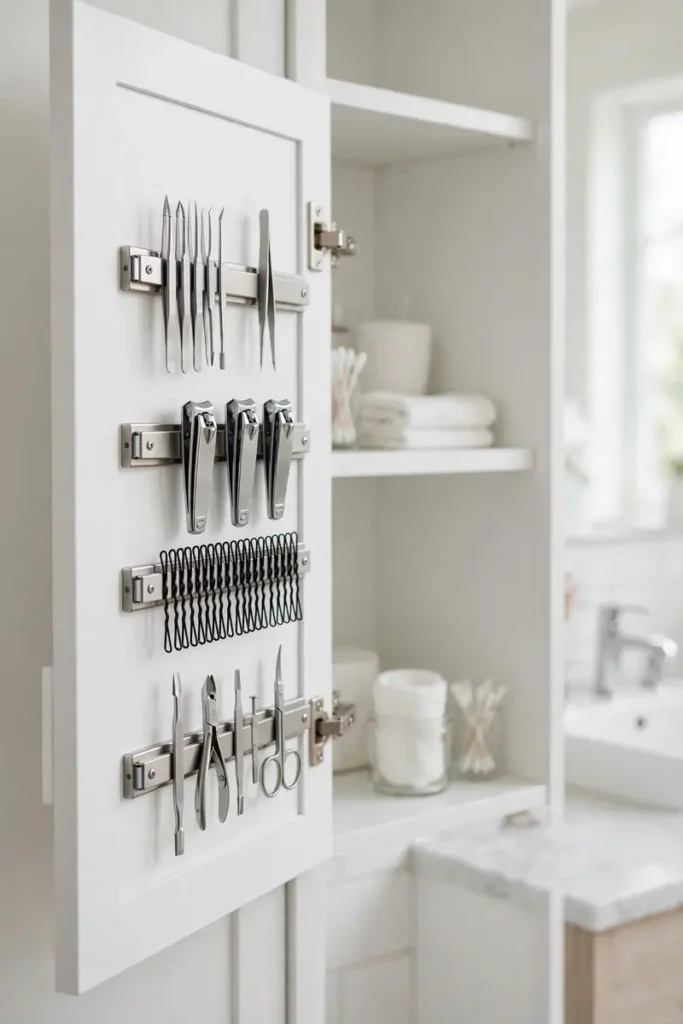
9. Magnetic Strip Organizer for Small Items
Bobby pins, tweezers, nail clippers, and metal grooming tools vanish into drawers and never come back — a magnetic strip mounted inside a cabinet door or on the wall holds them all in plain sight. It’s the cheapest, easiest storage upgrade on this entire list, and it genuinely changes your morning routine.
For tiny metal essentials, these small bathroom storage ideas diy keep everything visible and within reach.
Materials + cost: One magnetic knife strip ($8–$12), screws or strong adhesive mounting tape ($4). Total: about $10–$16.
Mount the strip inside a medicine cabinet door or on the wall beside your mirror — inside the door is best because it hides the metal items and keeps them away from humidity. Press your metal grooming tools against it: tweezers, nail clippers, bobby pins, nail files, even small scissors. They snap into place and stay visible. If you’re renting, adhesive mounting tape rated for several pounds works perfectly and comes off cleanly.
Pro tip: Keep a small magnetic dish on the counter for the bobby pins you’re using right now, and let the strip be long-term storage — it stops the pins from migrating across the whole bathroom.
Variation idea: Glue small magnets to the bottoms of spice tins and stick them on the strip for pill organizers, band-aids, or jewelry.
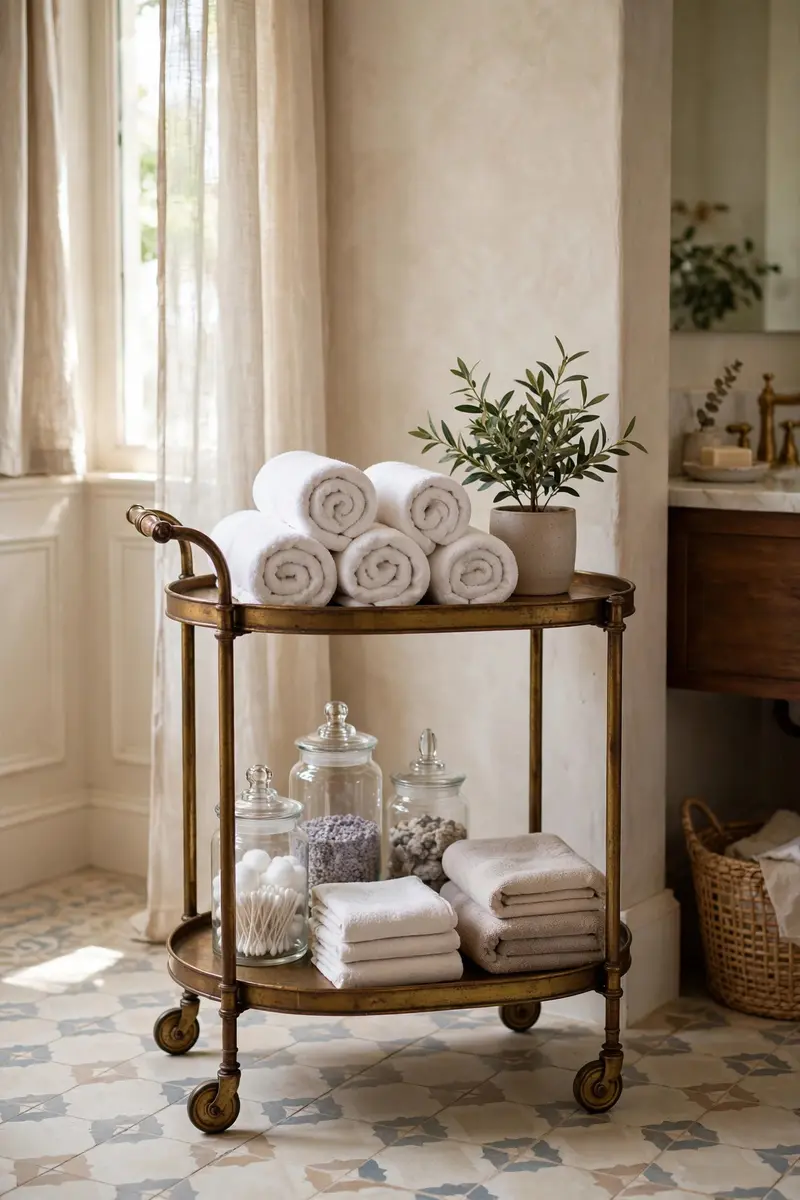
10. Repurposed Bar Cart as Bathroom Storage
A thrifted bar cart — all brass rails and wheels — makes a surprisingly perfect bathroom storage station. It’s narrow enough for small bathrooms, rolls wherever you need it, and the two open tiers display rolled towels, apothecary jars, and plants like a styling moment. It looks like you bought it from a boutique, not a garage sale.
Repurposing furniture is one of the smartest small bathroom storage ideas diy strategies for tight budgets.
Materials + cost: One thrifted bar cart ($15–$30), optional spray paint ($6), shelf liner ($4). Total: about $15–$40.
Hunt thrift stores and marketplace listings for a sturdy two-tier cart — brass, bamboo, or painted wood all work. Clean it thoroughly, touch up with spray paint if the finish is rough, and add cut-to-size shelf liner on each tier for grip. Style the top tier with rolled towels and a small plant or candle, and use the bottom tier for bulk items: toilet-paper packs, spare shampoo, cleaning supplies in a pretty basket. Park it beside the vanity or in the corner that was collecting dust.
Pro tip: Spray-painting a mismatched cart matte black or brushed gold ($6 a can) makes even the saddest thrift find look intentional and expensive.
Variation idea: A small rolling kitchen island or microwave cart from a discount store works the same way for under $35 new.
11. Corner Shelves for Dead Corners
Bathrooms are full of corners that hold absolutely nothing — above the tub, beside the mirror, over the hamper. Corner shelves claim that wasted triangle with two or three small floating shelves that wrap the corner, perfect for candles, plants, and the pretty bottles you actually want to see.
Dead corners are prime real estate for small bathroom storage ideas diy.
Materials + cost: One corner shelf unit (wood or glass, $15–$25) or two small triangular-cut boards ($8–$12), L-brackets and screws ($6). Total: about $15–$30.
Pick the corner your eye goes to — usually above the tub or beside the vanity. Glass corner shelves read almost invisible and suit modern bathrooms; small wood triangles add warmth. Mount them high enough to clear the tub rim or counter backsplash, spacing them ten to twelve inches apart. Style lightly: one candle, one small humidity-loving plant like a fern or pothos, one pretty bottle. Corners collect clutter fast, so keep each shelf to three items max.
Pro tip: Glass corner shelves virtually disappear against tile, so they add storage without visually shrinking the room — the best pick for the very smallest bathrooms.
Variation idea: A hanging corner hammock shelf (rope + wood triangle) is a $10 DIY version that needs just one hook.

12. Upgrade Your Shower Storage (Niche-Style Caddy)
Suction-cup caddies slide down the wall, over-the-head hooks rust, and bottles live on the tub ledge — shower storage is a universal disaster. The fix is either a proper built-in-style shower niche organizer or a sturdy tension-pole caddy that wedges floor-to-ceiling in the shower corner. Both look like a renovation upgrade for a fraction of the cost.
Don’t forget the shower when planning small bathroom storage ideas diy — bottles need homes too.
Materials + cost: One tension-pole shower caddy ($25–$40) or a no-demo adhesive shower niche shelf ($15–$25). Total: about $15–$40.
For the tension-pole caddy: place it in the shower corner, extend the pole until it wedges firmly between floor and ceiling, and adjust the shelves to your bottle heights — heavier items low, daily shampoo and conditioner at chest height. For adhesive niches: clean the tile with rubbing alcohol, stick the shelves in a neat vertical column, and let the adhesive cure for the full time on the package (usually 24 hours) before loading. Decant big family-size bottles into smaller matching dispensers so the whole column looks uniform.
Pro tip: Cut your shower products to five bottles max. Nobody needs four conditioners — decluttering the shower is free storage you already had.
Variation idea: Two slim adhesive shelves flanking the shower head — one for your products, one for your partner’s — ends the great shower-shelf war.

Frequently Asked Questions
How can I add storage to a small bathroom without drilling holes?
Lean on gravity and tension instead of screws: a leaning ladder shelf needs no mounting at all, over-the-door organizers hang on hooks, tension-rod shower caddies wedge between floor and ceiling, and adhesive hooks and shelves come off cleanly when you move out. Slim rolling carts and repurposed bar carts add furniture-style storage that stands on its own.
These small bathroom storage ideas diy prove you don’t need power tools to get organized.
What’s the best way to organize under the bathroom sink?
Start by emptying everything and tossing expired products, then work around the pipes: stackable bins create sortable “drawers,” a tension rod mounted near the top of the cabinet holds spray bottles by their triggers, and an adhesive hook inside the door handles the hairdryer. Label every bin so the system survives past week two.
How do I store towels in a tiny bathroom?
Roll instead of fold — rolled towels pack tighter and look styled. Then pick your weapon: hooks take less room than a towel bar, wall-mounted baskets turn towels into decor, floating shelves hold rolled stacks above the toilet, and a leaning ladder shelf gives you four rungs of towel display with almost no footprint.
What are cheap DIY bathroom storage ideas under $20?
Mason jar wall organizers, a magnetic strip for grooming tools, an over-the-door organizer, a tension rod for under-sink spray bottles, and thrifted crates as cubby shelves all come in under $20. The cheapest of all is a decluttering session — throwing out half-empty bottles frees more space than any product you can buy.
Every one of these small bathroom storage ideas diy costs less than a takeout dinner.
How can I make a small bathroom look less cluttered?
Corral everything into containers: baskets, bins, trays, and jars. Visible clutter reads as mess, but the same items grouped inside a basket read as “organized.” Keep open shelving styled with intention — a third of each shelf empty — and stash the truly ugly stuff (cleaning supplies, bulk packs) behind closed bins or inside the vanity.
The Takeaway
A small bathroom isn’t a storage problem — it’s a storage opportunity wearing a disguise. Every one of these twelve small bathroom storage ideas diy reclaims space you already own: the wall above the toilet, the back of the door, the inside of the cabinet door, the dead corner beside the tub. Pick the two or three that fit your bathroom (and your budget), spend a weekend on them, and you’ll wonder how you ever lived with the chaos. Found an idea you love? Save this post to your Pinterest board so it’s there when the DIY mood strikes — your future organized self will thank you. Keep exploring our modern bathroom decor ideas, DIY bathroom decor ideas, and rental bathroom decor ideas (no renovation) — or browse The Spruce’s small bathroom storage ideas for even more inspiration. Which of these small bathroom storage ideas diy will you try first?



4 Comments